How to deploy your Next.js app on Netlify using Github Actions — Are you interested in Next.js and how to deploy your app to Netlify using Github Actions? Take a look at how Netlify allows you for free, to deploy your app with Server Side Rendering capabilities and more!.
Published
I've recently spent some time working with Next.js projects. Once my projects are done, the next logical step is to deploy these apps to be accessible to the world.
I have naturally used the Vercel platform, which couldn't be easier to use and deploy your application with ease. Then I tried AWS Amplify, which I particularly love but for now, requires you to use the Serverless Framework if you want to benefit from Server Side Rendering (SSR) capabilities.
Then, I remembered that Netlify has added support for Next.js, including dynamic routes, Preview Mode and more around November 2020. It was time for me to try it! But I also wanted to have a real CI/CD in place, to test my code and do more actions before deploying to Netlify. That's where Github Actions came to the rescue!
I'm going to describe in this article, all the steps you need to take to deploy your Next.js application on Netlify using Github Actions.
The full version of the project can be found on Github.
Create a new Next.js App and push it to Github
As always, you need to have a recent version of Node and NPM installed on your machine. I personally recommend using NVM since it simplifies having multiple active Node.js versions.
To create a new Next.js project, type this command in your CLI:
npx create-next-app name-of-your-app

# move into the app's root directory
cd ~/path-to-projects/name-of-your-app/
This will install a new application using a basic Next.js boilerplate. Don't forget to move to your app root folder before launching any next commands.
Once your Next.js project is locally created, you can create a new project on Github and push the code generated.
(For those you are new to coding, feel free to follow these steps to create a new repository on Github.)
Setting up your Netlify project
There are 2 ways of creating a new Netlify project:
- Creating a project online here
- Using the Netlify CLI.
Let's use the CLI this time, I'm sure you already created a new project in the past using the Netlify interface.
Let's start by installing netlify-cli globally:
npm install netlify-cli -g
Then check if the installation succeeds, confirming with this command:
netlify
Netlify account authentication
Now you need to link your computer with your Netlify account. To authenticate with Netlify, you need to run this command:
netlify login
This will open a new tab in your browser where you'll need to "Authorize your Application" and then grant access to Netlify CLI.
In case you already logged in previously, the console will output:
Already logged in via netlify config on your machine
Netlify project creation
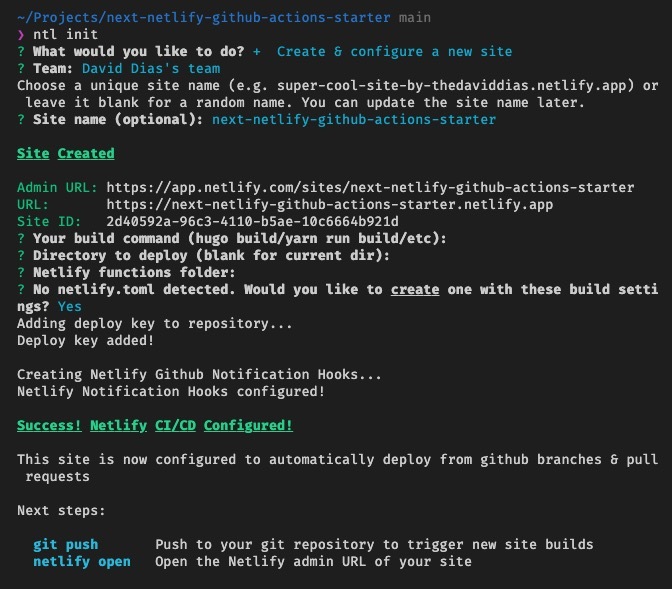
Now that your CLI is authorized to communicate with your Netlify account, it's time to programmatically create a new project:
# create a new Netlify site using the Netlify shortcut: ntl
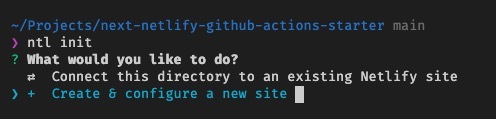
ntl init
The first question you are asked is if you want to connect this directory to an existing Netlify site or create & configure a new site. Choose Create & configure a new site:
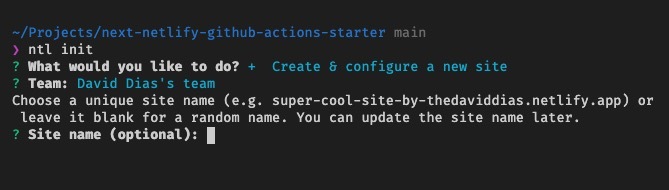
Then you have to choose your team:

Choose the name of your application:
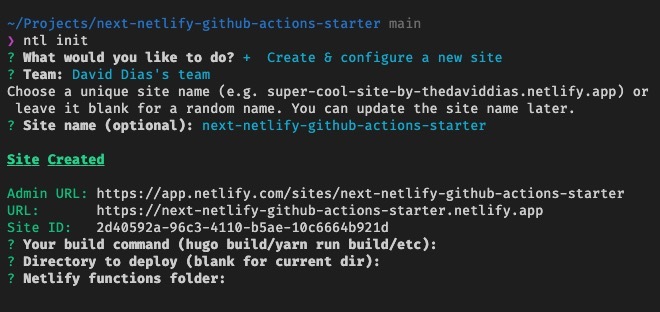
After entering the name of your project, the site is created and few URLs populated the CLI which gave you access to your admin URL, the URL of your site and the Site ID. Keep the site ID aside, you will need that number later on.
For the next 3 questions (build, start and function), insert a space. We are not going to directly use the NPM scripts, our Github actions will later trigger each command.
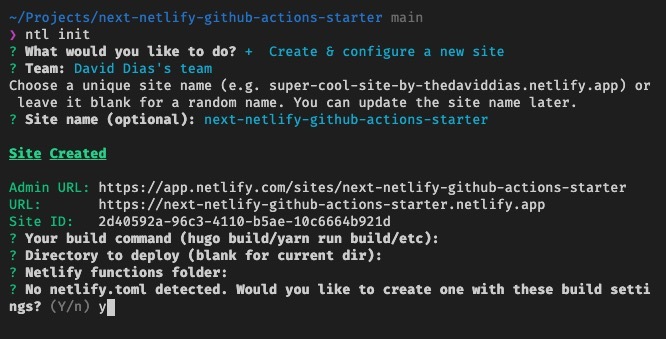
Finally, automatically create a netlify.toml file, which we will edit later. If your respond no, you can still create that file manually at the root of your project.
Once you provided an answer to all the questions, your terminal should look like this:
Updating our Netlify project
It's now time to change some options on our Netlify project. Open directly your project on Netlify with this command:
ntl open
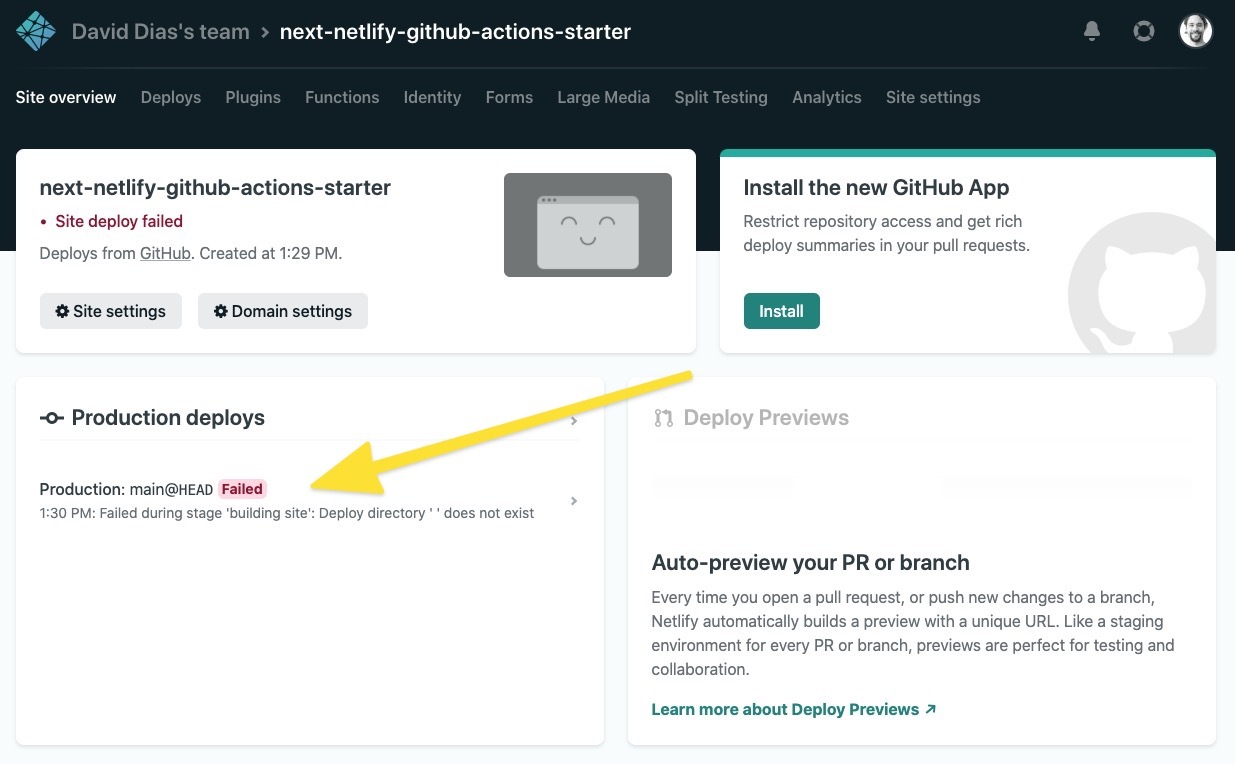
You should see that our production deployment failed. You don't have to worry, this is totally normal. We need to disable our automatic build because our Github Actions will take care of it.
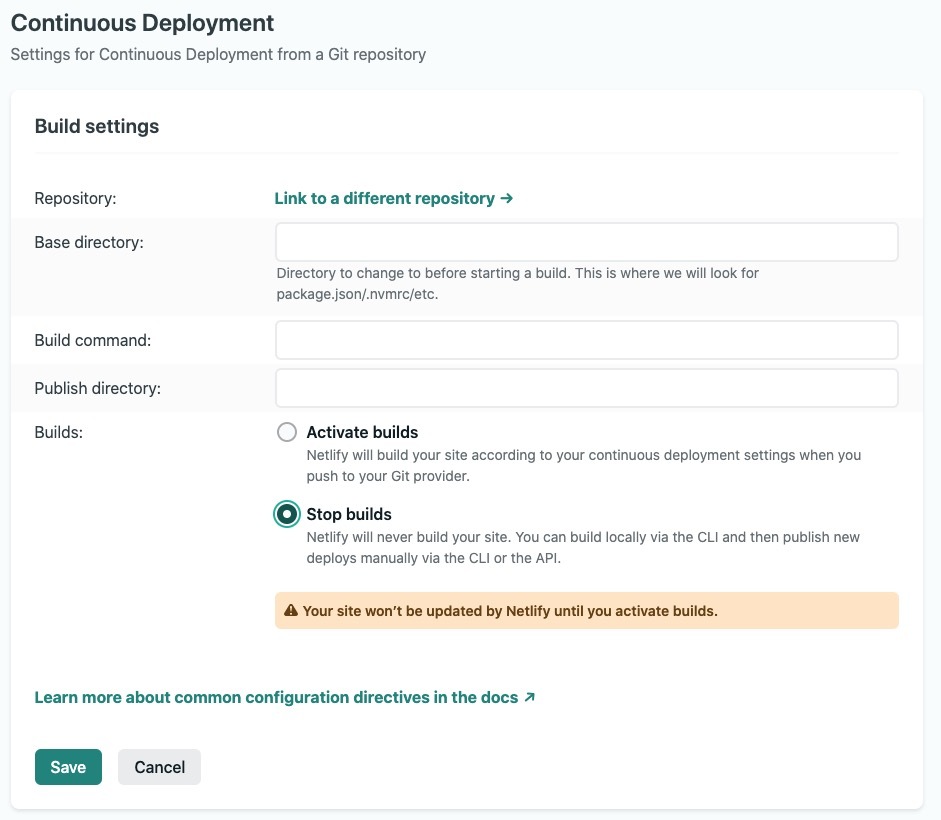
Go in your Settings > Build & deploy. Click on Edit settings and Stop builds. Save.
Just below, go to the Deploy contexts section and select None for the Deploy previews.
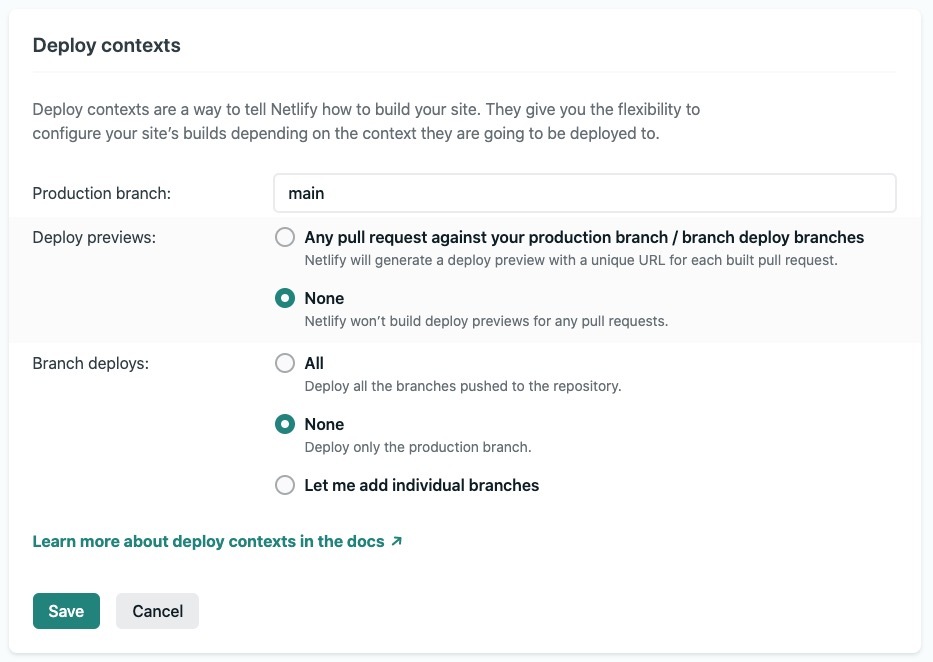
Don't worry, like the build, we will create our preview URL using Github actions.
Enable server-side rendering on Netlify
If you have been using Next.js you are aware of the capability to do the server-side rendering. But usually, you will need to configure a Node server and that's something we don't want to have to deal with. Around October 2020, the Netlify team started working on next-on-netlify, a utility to enable SSR in Next.js on Netlify. That's what we are going to use here.
(In case you are not interested in Github Actions and want to use Netlify to build your project, take a look at how to use the Next on Netlify Plugin. It directly wraps your Next.js app and doesn't need as much configuration as we are going to explain.)
Let's start by installing our utility:
npm install -D next-on-netlify
Set Next.js target to serverless
We must build our Next.js app as a serverless app
module.exports = {
  // Target must be serverless
  target: "serverless",
};
Add a post build hook
We need to add a postbuild command that is automatically triggered after our build command finishes. next-on-netlify does a lot of "magic" to copy and set up our Next.js app to be correctly hosted on Netlify.
{
  "name": "next-netlify-github-actions-starter",
  "version": "0.1.0",
  "private": true,
  "scripts": {
    "dev": "next dev",
    "build": "next build",
    "start": "next start",
    "postbuild": "next-on-netlify"
  },
  ...
}
Configure Netlify
Remember the file that was automatically created and called netlify.toml? You can remove all the boilerplate and replace it with only this code (be careful in respecting the indentation):
[build]
  command   = ""
  functions = "out_functions"
  publish   = "out_publish"
Technically, when next-on-netlify will run, it will take what is in these folders and host it on Netlify. DO NOT CHANGE the name of these folders as these are hardcoded into the utility.
Don't forget to add these line to your .gitignore file
# Netlify build
out_*
You can commit your files. Let's work now on the Github Actions configuration.
Github Actions configuration
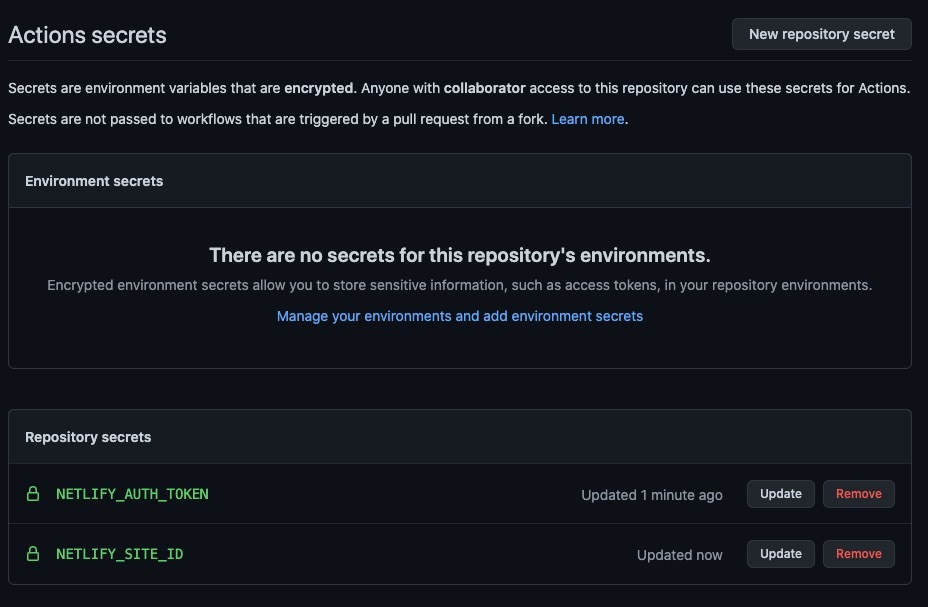
The netlify configuration is now done, all dependencies installed, it's time to configure our Github actions which will test, build and deploy our Next.js application to Netlify. But before that, we need to set up some Github secrets that we will need in our GH Actions.
Go to your Github project > Settings > Secrets > New repository secret
| Actions secret name | Comments |
|---|---|
NETLIFY_AUTH_TOKEN | Request your token |
NETLIFY_SITE_ID | The site to where deploy your site (get it from the API ID on your Site Settings) |
Create a new file called main.yml inside .github/workflows. Copy-paste the following code and read the explanation of it after this snippet.
name: Main workflow

on:
  pull_request:
    branches:
      - master
      - main
    types: [opened, synchronize, reopened]

jobs:
  test:
    runs-on: ubuntu-latest
    steps:
      - name: Checkout code
        uses: actions/checkout@v2

      # Cache node modules and next folder
      - name: 📬 Caching
        uses: actions/cache@v2
        with:
          path: |
            **/node_modules
            ${{ github.workspace }}/.next/cache
          key: ${{ runner.os }}-modules-${{ hashFiles('**/package-lock.json') }}

      - name: Use Node.js 14.x
        uses: actions/setup-node@v1
        with:
          node-version: 14.x

      - name: 🧰 Install dependencies
        run: npm run install

      - name: 📦 Build project
        run: npm run build --if-present

      # - name: 🧹 Run lint
      #   run: npm run lint

      # - name: 🐛 Run tests
      #   run: npm run test

      # Deploy to Netlify with a personalized message
      - name: 🚀 Deploy to Netlify
        id: deploy-netlify
        uses: netlify/actions/cli@master
        env:
          NETLIFY_AUTH_TOKEN: ${{ secrets.NETLIFY_AUTH_TOKEN }}
          NETLIFY_SITE_ID: ${{ secrets.NETLIFY_SITE_ID }}
        with:
          args: deploy -m 'v${{ steps.package-version.outputs.current-version}} ・ ${{ github.head_ref }}'
Detailed explanation of the main workflow file
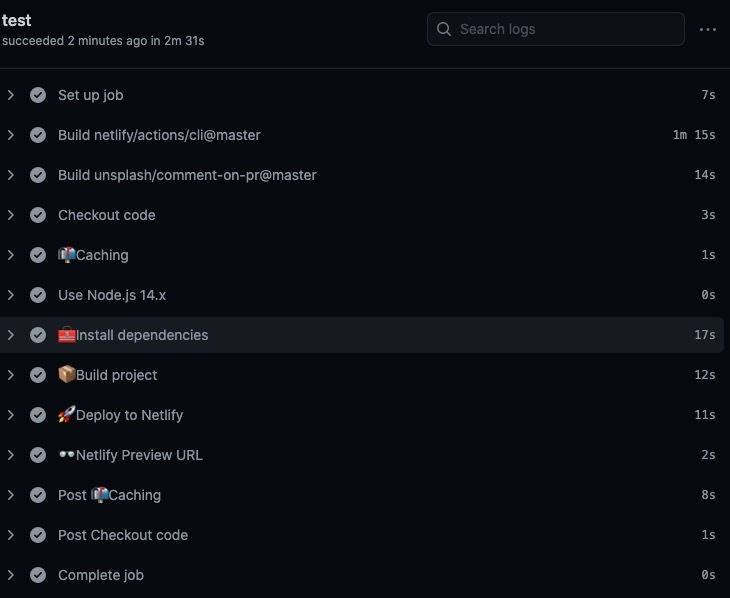
- Give a name to your Github action
- Choose which type of the event should trigger this action, you can use push instead of pull_request, it's up to you.
- Specify on which system this action should be launched, I choose the latest version of Ubuntu (Linux).
- Checkout your code
- Cache your node modules and the .next/cache folder. When you will first run this action, it will take some time. On the second launch, the action will take the modules that exist in the cache and will then proceed way faster.
- Specify the version of Node you want to use, in my case, I choose the most recent version of Node 14th.
- Install the dependencies of your project.
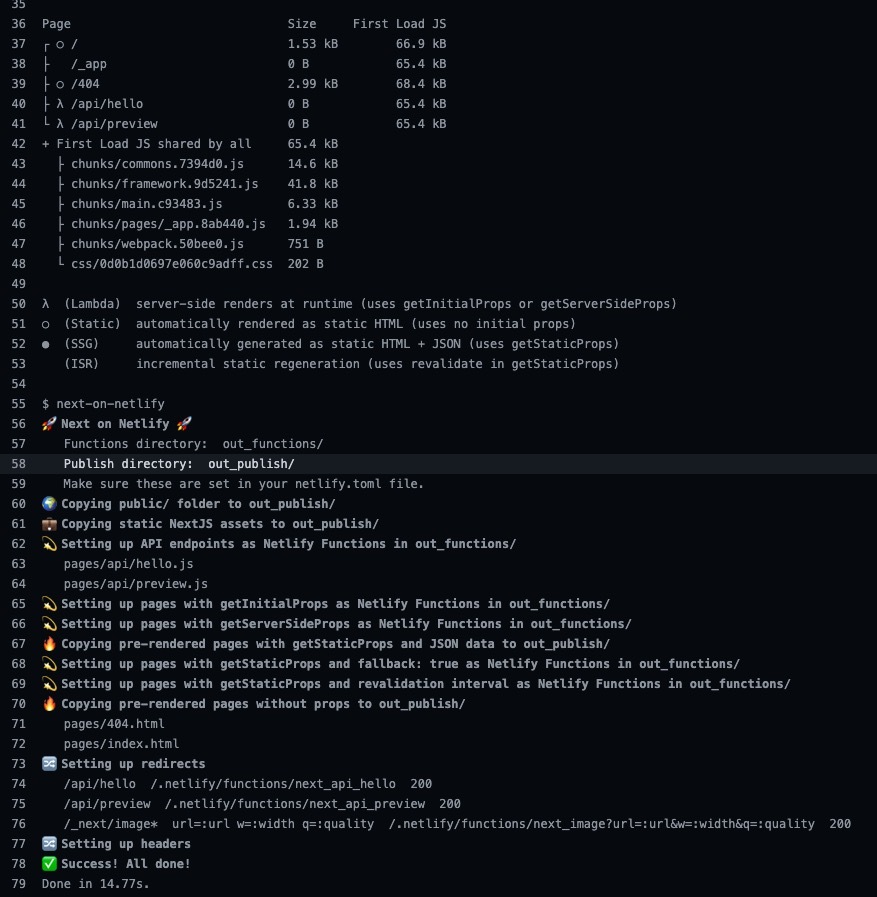
- Build your project. Remember that after the build, the post-build command will be launch. This is what you should see in the
buildlogs in your Github Action tab: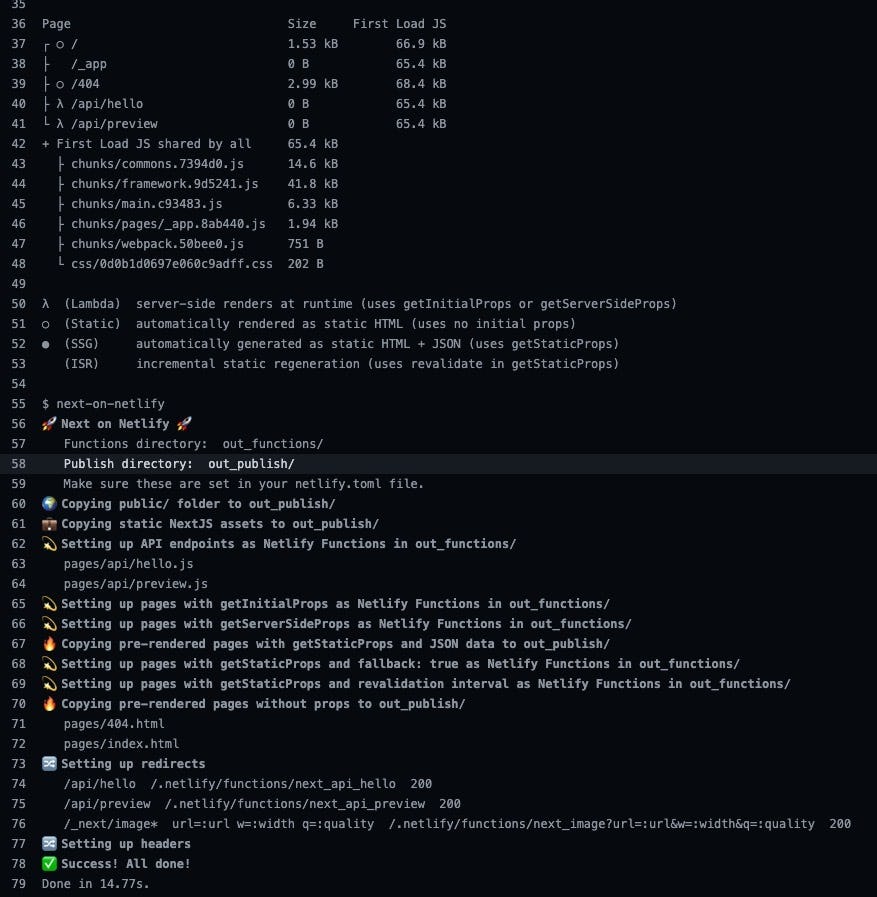
- I added lint and test commands, which I commented. You can use these to trigger ESLint, Jest (even Cypress) or any other plugin that ensures your code doesn't have any issue.
- Finally, we trigger the Netlify deployment to deploy our Next.js app to Netlify. 🎉
You may have seen an argument passed to the Netlify deploy:
args: deploy -m 'v${{ steps.package-version.outputs.current-version}} ・ ${{ github.head_ref }}'
This will add a message for each Deploy Preview, a way to keep track of which PR generated which Deploy.
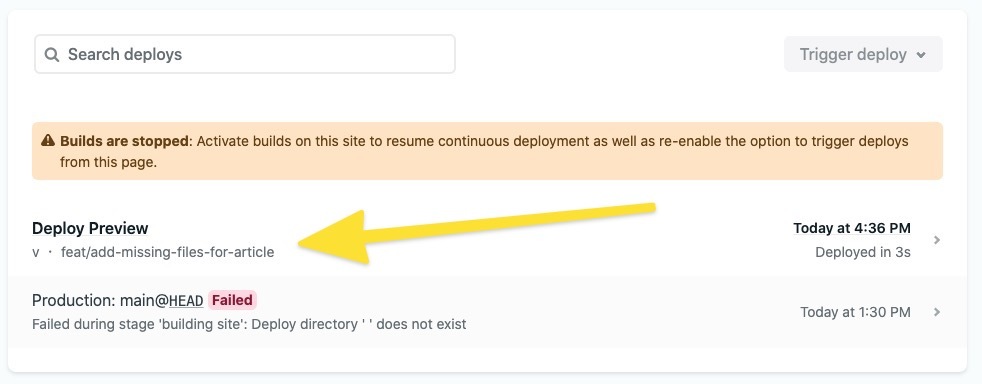
On the same deploy page, you can click on the Deploy Preview and access your app using the preview URL.
A better way would be to use another task to automatically populate your pull request with the log and preview URL. At the end of your file, add this action:
# Publish the inspect and preview link to the PR
- name: 👓 Netlify Preview URL
  uses: unsplash/comment-on-pr@master
  env:
    GITHUB_TOKEN: ${{ secrets.GITHUB_TOKEN }}
    OUTPUT: "This pull request is being automatically deployed to Netlify.\n\n🔍 Inspect: ${{ steps.deploy-netlify.outputs.NETLIFY_LOGS_URL }}\n✅ Preview: ${{ steps.deploy-netlify.outputs.NETLIFY_URL }}"
  with:
    msg: ${{ env.OUTPUT }}
    check_for_duplicate_msg: false
This will automatically create a comment in your PR.

Summary
If you are still reading this, congrats! You have succeeded in deploying a fully enabled Next.JS application to Netlify using Github Actions!
The next step for you now will be to add some linting rules and tests to ensure that you are sending to Netlify, an app that works perfectly!
Feel free to download or fork the next-netlify-github-actions-starter, open an issue if you find any problem or send me any suggestion to make it better!
Sources:
- How to Deploy Next.js Sites to Netlify by Jason Lengstorf
- Preview Mode for Next.js now fully supported on Netlify by Cassidy Williams
- Announcing one-click install Next.js Build Plugin on Netlify by Cassidy Williams
sponsoring me on Github or perhaps buy me a cup of coffee 😊
Complementary
Comments
Share your thoughts! If you don't have a Github account, you can tweet it!